建议在了解摄像机之前,如果你对3d图形中的坐标系统不是很了解的话,可以先去阅读一下坐标系统讲解的文章,在回到这里继续阅读。 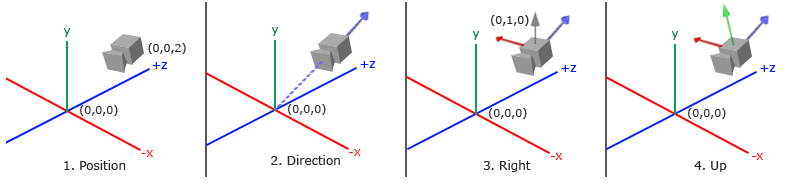
摄像机示意图(来源LearnOpengl_cn官网)
 对马岛之魂 镜井仁
多人在线的游戏世界中,同时在线的玩家一般有很多个。虽然他们游戏中的角色同处于一个游戏世界,但是每个玩家所见的场景是不一样的(屏幕上看到的场景),即使玩家站在游戏世界中同一个坐标,所见的场景一般也会不同,因为他们视线的方向不一样,看到的景色当然也不一样。即使角色坐标和视线方向完全一样,他们所见的场景也可能因为玩家的游戏设置导致看到的区域范围也不一样。
玩家在游戏世界中移动的的速度也不一样,玩家A可能在慢走状态,玩家B可能在奔跑,玩家C也许在骑马,玩家D可能正在睡觉。其实这些玩家在游戏中的角色就是本篇文章要讨论的摄像机。
通过以上描述,总结下摄像机(游戏角色)的几个功能:
在移动坐标的功能里1我们可以设置一个变量控制移动速度,在实现改变拍摄方向和缩放功能时也可以添加一个鼠标灵敏度的变量控制场景变化幅度。
在3D图形学中的矩阵变换(二)文章中简单的介绍了摄像机的概念,并讲述了基变换和lookAt矩阵。 摄像机的观察矩阵就是lookAt矩阵, 对矩阵证明感兴趣的可以去看一看我写的三篇有关矩阵证明的文章。
在3d图形中的坐标系统文章中,我介绍了gl-matrix和glm, 这两个都是三维数学库,gl-matrix是js写的,glm是c写的,有了这两个库,我们就不需要自己手动去实现lookAt矩阵了。
gl-matrix和glm都提供了lookAt方法。函数的参数也完全相同,以gl-matrix为例,函数原型如下:
function lookAt(out: mat4, eye: ReadonlyVec3, center: ReadonlyVec3, up: ReadonlyVec3): mat4;
| param | description |
|---|---|
| mat4 | 存储结果矩阵。 |
| eye | 摄像机在世界坐标系中的坐标。 |
| center | 拍摄的视线中心。 |
| up | 世界坐标的上方向,一般为[0, 1, 0]。 |
例如摄像机的坐标为(0, 0, 10),看向(0, 0, 0)点,那么可以如下创建lookAt矩阵:
var result = mat4.create();
mat4.lookAt(result, [0, 0, 10], [0, 0, 0], [0, 1, 0]);
所以,定义一个camera类,我们可以定义几个如下变量:
class Camera {
    public worldUp: vec3; // 世界方向的上方向向量
    public position: vec3; // 摄像机位置
    public front: vec3; // 摄像机的拍摄方向向量
}
获得lookAt矩阵,可以按照如下方式:
class Camera {
    ...
    public up: vec3; // 摄像机坐标系的上轴
    public getViewMatrix() {
        const center = vec3.add(vec3.create(), this.position, this.front);

        return mat4.lookAt(mat4.create(), this.position, center, this.up); // 使用gl-matrix的lookAt方法获得lookAt矩阵
    }
}
值得注意的是上面代码中的lookAt方法的第三个参数,我用的是up变量,表示的是摄像机的Y轴正向,而不是世界坐标系中的Y轴正向,是因为一般在飞行游戏中,需要模拟飞机绕自身的纵向的旋转,所以这里我使用的是摄像机坐标系统的上轴而不是世界坐标的上轴,当然你用worldUp传入lookAt矩阵的第三个参数也是满足接下来要实现的功能的。
我们需要让用户传入position、worldUp和front参数创建一个摄像机类, 并增加一个updateCameraVectors方法,用于更新向量。
class Camera {
    public worldUp: vec3; // 世界方向的上方向向量
    public position: vec3; // 摄像机位置
    public front: vec3 = [0, 0, -1]; // 摄像机的拍摄方向向量
    public up: vec3 = [0, 1, 0]; // 摄像机坐标系的上轴,默认指向世界坐标系y轴正向
    public right: vec3 = [1, 0, 0]; // 增加摄像机右轴,默认方向为世界坐标系x轴正向

    public constructor(position: vec3 = [0, 0, 0], worldUp: vec3 = [0, 1, 0]) {
        this.position = position;
        this.worldUp = worldUp;

        this.updateCameraVectors();
    }

    private updateCameraVectors() {
        vec3.cross(this.right, this.front, this.worldUp); // 通过front和worldUp的向量叉积更新right
        vec3.cross(this.up, this.right, this.front); // 通过right和front的叉积更新up向量
    }

    ...
}
初始的相机类如上,接下来我们实现移动功能。
处理移动我们可以添加一个processKeyboard方法,如下:
/**移动方向 **/
enum Camera_Movement {
    FORWARD,
    BACKWARD,
    LEFT,
    RIGHT
}

class Camera {
    ...

    public movementSpeed: number = SPEED; // 移动速度

    public processKeyboard(direction: Camera_Movement, deltaTime: number) {
        const velocity = this.movementSpeed * deltaTime;

        switch (direction) {
            case Camera_Movement.FORWARD:
                var movement = vec3.scale(vec3.create(), this.front, velocity);
                vec3.add(this.position, this.position, movement);
                break;
            case Camera_Movement.BACKWARD:
                var movement = vec3.scale(vec3.create(), this.front, velocity);
                vec3.sub(this.position, this.position, movement);
                break;
            case Camera_Movement.LEFT:
                var movement = vec3.scale(vec3.create(), this.right, velocity);
                vec3.sub(this.position, this.position, movement);
                break;
            case Camera_Movement.RIGHT:
                var movement = vec3.scale(vec3.create(), this.right, velocity);
                vec3.add(this.position, this.position, movement);
                break;
            default:
                break;
        }
    }
}
processKeyboard方法比较简单,就是通过传入的移动方向枚举值,改变position变量。第二个参数deltaTime,是为了处理不同机器(性能不一样)可能帧频率不一样造成移动速度悬殊比较大的问题,所以开放一个参数用于调整。
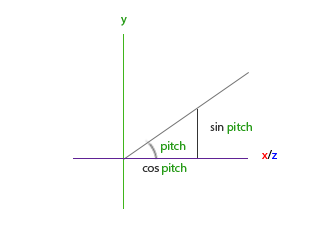
俯仰角就是我们抬头或者低头时,视线方向与水平方向的夹角。修改Camera的视线方向,就是修改Camera类的front变量,由上图可得front变量更新方法如下:
const x = Math.cos(glMatrix.toRadian(pitch)); // 注意我们需要将pitch转化为弧度
const y = Math.sin(glMatrix.toRadian(pitch));
const z = Math.cos(glMatrix.toRadian(pitch));
vec3.normalize(this.front, [x, y, z]);
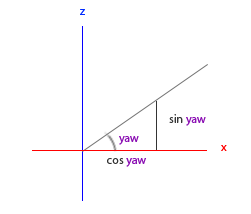
偏航角是当我们水平转动摄像机方向时(模拟人向左向右移动视线),摄像机front向量与x正向的夹角。由上图可得x、y、z分量计算如下:
const x = Math.cos(glMatrix.toRadian(yaw));
const z = Math.sin(glMatrix.toRadian(yaw));
// y不受偏航角影响
结合俯仰角,front变量更新如下:
const x = Math.cos(glMatrix.toRadian(yaw)) * Math.cos(glMatrix.toRadian(pitch));
const y = Math.sin(glMatrix.toRadian(pitch));
const z = Math.sin(glMatrix.toRadian(yaw)) * Math.cos(glMatrix.toRadian(pitch));
vec3.normalize(this.front, [x, y, z]);
引入pitch和yaw更新Camera。
const YAW = -90;
const PITCH = 0;
...

class Camera {
    ...

    /**yaw angle: 偏航角 */
    public yaw: number;
    /**pitch angle: 俯仰角 */
    public pitch: number;

    public constructor(position: vec3 = [0, 0, 0], worldUp: vec3 = [0, 1, 0], yaw: number = YAW, pitch: number = PITCH) {
        this.position = position;
        this.worldUp = worldUp;
        this.yaw = yaw;
        this.pitch = pitch;

        this.updateCameraVectors();
    }

    private updateCameraVectors() {
        const x = Math.cos(glMatrix.toRadian(this.yaw)) * Math.cos(glMatrix.toRadian(this.pitch));
        const y = Math.sin(glMatrix.toRadian(this.pitch));
        const z = Math.sin(glMatrix.toRadian(this.yaw)) * Math.cos(glMatrix.toRadian(this.pitch));
        vec3.normalize(this.front, [x, y, z]);
        vec3.cross(this.right, this.front, this.worldUp);
        vec3.cross(this.up, this.right, this.front);
    }
}
接下来,通过鼠标移动来控制摄像机拍摄方向。增加processMouseMovement方法:
...
const SENSITIVITY = 0.1;

class Camera {
    ...

    public mouseSensitivity: number = SENSITIVITY; // 鼠标灵敏度
    public processMouseMovement(xoffset: number, yoffset: number, constrainPitch: boolean = true) {
        xoffset *= this.mouseSensitivity;
        yoffset *= this.mouseSensitivity;

        this.yaw += xoffset;
        this.pitch -= yoffset;
        if (constrainPitch) {
            if (this.pitch > 89) this.pitch = 89;
            if (this.pitch < -89) this.pitch = -89;
        }

        this.updateCameraVectors();
    }
}
第二个参数constrainPitch,是用于限制俯仰角的,一般玩家在游戏世界中,只允许抬头低头在负90至正90度范围。
至此,我们已经完成了主要的移动和更改视线方向的功能。
缩放功能,可以通过几种方式实现,第一种可以改变相机距离物体的距离,第二种通过视野改变也就是透视矩阵的fov,即mat4.perspective的第二个参数:
function perspective(out: mat4, fovy: number, aspect: number, near: number, far: number): mat4;
当视野从小变大,视野中的物体由于相对关系会变得越来越小。这两种方式,第一种显然不是我们想要的。所以我们使用第二种方式。 关于透视矩阵,可以看之前的文章:3D图形学中的矩阵变换。
使用第二种方式,我们在Camera类中增加一个zoom变量。
const ZOOM = 45;
class Camera {
    public zoom: number = ZOOM;

    // 处理鼠标滚轮,控制zoom增减
    public processMouseScroll(yoffset: number) {
        this.zoom += yoffset;
        if (this.zoom < 1) this.zoom = 1;
        if (this.zoom > 60) this.zoom = 60;

        this.updateCameraVectors();
    }
}
在使用时,只需要将zoom变量传入perspective函数,创建透视矩阵即可:
const projection = mat4.perspective(mat4.create(), glMatrix.toRadian(camera.zoom), gl.canvas.width / gl.canvas.height, 0.1, 100);
至此所有功能均已完成。
可以在这里获得完整代码:camera.ts
下面是我写的一个简单的使用demo。
代码:cameraDemo。
(完)
